Chicken Pot Pie Recipe: Easy and Delicious
When it comes to comfort food, few dishes can compete with the warmth and satisfaction of a homemade classic. This easy-to-follow recipe brings together a flaky, buttery crust and a rich, creamy filling packed with tender ingredients. It’s the perfect meal for chilly evenings or when you’re craving something hearty and wholesome.
This beloved dish has been a reader favorite since 2014, with updates including step-by-step photos and a video tutorial to guide you. Whether you’re a seasoned cook or just starting out, you’ll find the process straightforward and rewarding. Plus, the make-ahead tips ensure you can prepare it with ease, even on busy days.
Ready to dive in? Let’s explore how to create this timeless comfort food masterpiece from scratch. From the first bite, you’ll understand why this recipe has stood the test of time.
Key Takeaways
- Perfect for cold weather, this dish is a comforting, all-in-one meal.
- Features a double buttery, flaky crust with a creamy filling.
- Completely homemade with easy-to-follow steps.
- Reader favorite since 2014, with continuous updates.
- Includes make-ahead strategies for convenience.
Ingredients & Essential Tools
The foundation of any great meal lies in the quality of its components and the equipment used. To create a dish that’s both comforting and flavorful, you’ll need fresh ingredients and the right tools. Let’s break down what you’ll need to get started.
Fresh Ingredients and Seasonings
Using fresh, high-quality ingredients is key to achieving a rich and creamy filling. Start with boneless, skinless chicken, which provides a tender base. Add carrots, celery, and onion for a mix of sweetness and crunch. Garlic, salt, pepper, and thyme bring depth and warmth to the dish.
For the pie crust, you’ll need butter, flour, and a pinch of salt. These simple ingredients, when handled correctly, create a flaky, buttery crust that’s the perfect complement to the filling. Don’t forget chicken stock, which forms the base of the creamy gravy.
Kitchen Tools and Equipment Overview
Having the right tools on hand makes the process smoother and more enjoyable. A rolling pin is essential for shaping the pie crust, while a pastry brush helps seal and glaze the edges. A whisk ensures the gravy is smooth and lump-free, and a proper pie dish promotes even baking.
High-quality tools, like a sturdy whisk and a reliable pie dish, can make a significant difference in the final result. They help manage heat distribution and ensure your dish bakes evenly, giving you a perfectly golden crust every time.
| Ingredient | Quantity | Purpose |
|---|---|---|
| Boneless Chicken | 6-7 cups | Main protein |
| Carrots | 1 cup | Sweetness and texture |
| Onion | 1 medium | Flavor base |
| Butter | 6 tbsp | For crust and gravy |
| Flour | 6 tbsp | Thickening agent |
By carefully selecting your ingredients and using the right tools, you’ll set yourself up for success. This preparation ensures every bite is packed with flavor and comfort.
Preparing Your Homemade Pie Crust
Crafting the perfect crust is the cornerstone of a memorable dish. Whether you’re a seasoned baker or a beginner, mastering the art of homemade dough can make all the difference. Let’s explore why making your own crust is worth the effort and how to do it right.
Homemade Pie Dough vs. Store-Bought Alternatives
Creating your own pie crust offers unmatched flavor and texture. Store-bought options may save time, but they often lack the buttery richness and flakiness of a homemade version. By using fresh ingredients like butter and flour, you can control the quality and taste of your crust.
A double-crust design is essential for holding the rich filling securely. This ensures every bite is as satisfying as the last. Plus, making your own dough allows you to customize the thickness and flavor to suit your preferences.

Chilling and Rolling Techniques
Proper chilling is key to achieving a flaky crust. After preparing the dough, refrigerate it for at least 2 hours. This step prevents the butter from melting too quickly during baking, ensuring a crisp, golden finish.
When rolling out the dough, turn it frequently to avoid sticking and to maintain an even thickness. Use a lightly floured surface and a rolling pin for best results. Aim for a thickness of about 1/8 inch for the perfect balance of structure and tenderness.
For added flakiness, consider using a combination of butter and shortening. Butter provides flavor, while shortening enhances crispness. This blend creates a crust that’s both tender and sturdy.
| Step | Time | Purpose |
|---|---|---|
| Chill Dough | 2 hours | Enhances flakiness |
| Roll Dough | 5-10 minutes | Ensures even thickness |
| Bake Crust | 15-20 minutes | Creates golden finish |
Planning ahead is crucial. Prepare your dough a day in advance to save time on cooking day. With these tips, you’ll have a crust that’s as impressive as the filling it holds.
Chicken Pot Pie Recipe: Step-by-Step Instructions
Mastering the art of a classic dish starts with precise steps and fresh ingredients. Follow these detailed instructions to create a meal that’s both comforting and satisfying. From preparing the filling to assembling the crust, every step ensures a delicious result.
Cooking the Filling
Begin by boiling boneless meat with carrots and celery until tender. Drain the mixture and set it aside. In a separate pan, sauté onions and garlic in butter until fragrant. This forms the flavorful base for your dish.

Creating the Gravy
Next, prepare a roux by whisking flour into the sautéed mixture. Gradually add chicken broth and half-and-half, stirring constantly to avoid lumps. Cook until the sauce thickens into a rich, creamy gravy. Season with salt, pepper, and thyme for added depth.
Assembling the Crust
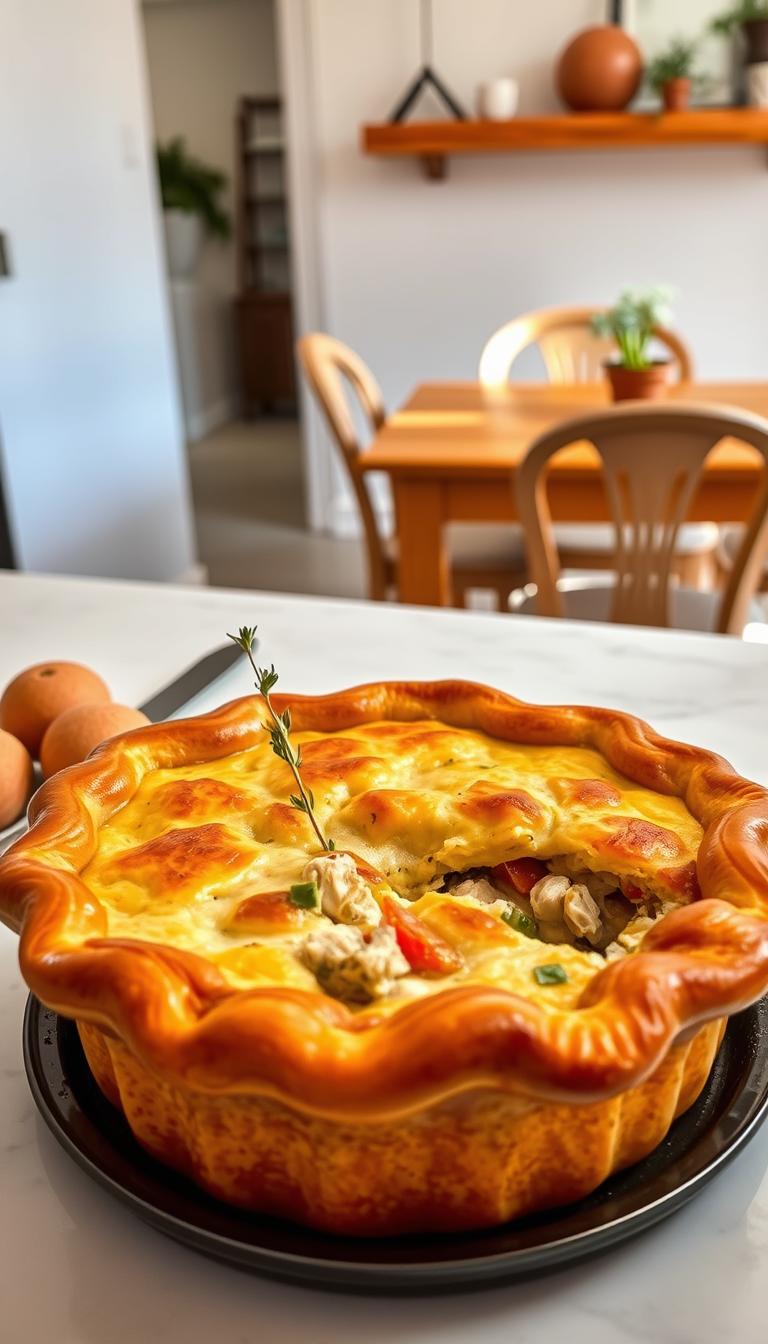
Roll out two discs of dough to about 1/8-inch thickness. Place the bottom crust in your pie dish, ensuring it covers the edges. Layer the cooked filling and frozen peas evenly. Pour the gravy over the mixture, spreading it smoothly.
Place the top crust over the filling, sealing the edges with a crimped pattern. Cut small slits in the top to allow steam to escape. Brush the surface with an egg wash for a golden brown finish.
| Step | Time | Key Detail |
|---|---|---|
| Boil Filling | 15 minutes | Tenderize meat and veggies |
| Make Gravy | 10 minutes | Thicken with flour and broth |
| Assemble Pie | 15 minutes | Seal and vent crust |
Once assembled, bake at 425°F for 20-25 minutes, or until the crust is golden brown and the filling is bubbly. Let it cool slightly before serving for the best texture and flavor.
Tips, Tricks, and Make-Ahead Strategies
To ensure your dish turns out perfectly every time, a few expert tips can make all the difference. Whether you’re prepping ahead or troubleshooting common issues, these strategies will help you achieve the best results.
Preventing a Soggy Bottom Crust
Avoiding a soggy crust starts with how you layer your ingredients. Instead of pouring the gravy directly onto the bottom crust, spread it over the filling. This creates a barrier that keeps the crust crisp.
Another tip is to pre-bake the bottom crust for 5-7 minutes before adding the filling. This step ensures a sturdy base that won’t absorb too much moisture during baking.
Make-Ahead and Freezing Instructions
Planning ahead can save you valuable time on busy days. You can pre-cook the filling and gravy a day in advance. Store them separately in the fridge for up to 3 days. When ready to assemble, simply reheat the filling slightly before adding it to the crust.
For longer storage, freezing is a great option. Assemble the dish without baking, wrap it tightly in foil, and freeze for up to 2 months. When you’re ready to cook, bake it straight from the freezer, adding an extra 10-15 minutes to the baking time.
- Reheat leftovers at 350°F, covered with foil, to maintain moisture.
- Adjust seasoning as needed when reheating to enhance flavor.
- Use a pie shield or foil to protect the crust edges from overbrowning.
These make-ahead strategies not only save time but also ensure your dish is just as delicious as when it’s freshly made.
Variations and Substitutions for Customization
Customizing your meal to fit dietary needs or personal preferences is easier than you think. Whether you’re avoiding dairy, gluten, or simply want to mix things up, there are plenty of ways to adapt this dish to suit your taste.
Swaps for Dairy-Free or Gluten-Free Options
For a dairy-free version, swap cow’s milk with your favorite nut milk, like almond or oat. These alternatives provide a creamy texture without compromising flavor. If you’re avoiding gluten, use a 1:1 baking flour blend or a gluten-free pastry dough. These adjustments ensure the dish remains just as delicious.

Adapting the Recipe with Different Meats and Veggies
Feel free to experiment with the protein and vegetable choices. Turkey or leftover roasted meat can replace the traditional option for a unique twist. Add extra vegetables like mushrooms, corn, or potatoes to enhance the filling. These changes not only refresh the dish but also add new flavors and textures.
When substituting ingredients, adjust the seasoning to maintain balance. A pinch of extra herbs or a teaspoon of your favorite spice can complement the new additions perfectly. Use a tablespoon or teaspoon for precise measurements to ensure consistency.
| Ingredient | Substitution | Purpose |
|---|---|---|
| Milk | Nut milk | Dairy-free option |
| Flour | Gluten-free blend | Gluten-free alternative |
| Meat | Turkey or leftovers | Variety in protein |
| Vegetables | Mushrooms, corn, potatoes | Enhanced filling |
Don’t be afraid to get creative. Tailor the filling to your personal taste preferences. Whether you’re adding a splash of water to thin the gravy or letting the crust turn a rich brown, these small changes can make a big difference.
Serving, Reheating, and Presentation Ideas
Serving and presenting your meal with care can elevate the dining experience. Whether you’re enjoying leftovers or hosting a dinner party, these tips will help you maintain the dish’s quality and visual appeal.
Proper Reheating Techniques for Leftovers
To reheat your meal, preheat the oven to 350°F. Cover the dish with foil to protect the crust’s edge from overbrowning. Place it in the oven for about 15-20 minutes, or until the filling is heated through. This method ensures the crust stays crisp while the filling warms evenly.
Let the dish rest for a few minutes before serving. This allows the filling to set, making it easier to slice. Using a metal or glass dish enhances heat conduction, ensuring consistent warmth throughout.

Garnishing and Plating Suggestions
Presentation matters as much as taste. Garnish your dish with sprigs of fresh thyme or a light dusting of black pepper for a professional touch. The crimped edge of the crust, glistening from the egg wash, adds a rustic charm.
Serve at a medium temperature to balance the crispy crust and warm filling. For a visually appealing setup, use a clean, white plate to highlight the golden-brown crust and creamy interior. These small details can make your meal feel special, whether it’s a family dinner or a gathering with friends.
Conclusion
Creating a warm, hearty meal doesn’t have to be complicated. This dish combines simplicity with rich flavors, making it a go-to for any occasion. From crafting a homemade crust to assembling the filling, each step is designed to be straightforward and rewarding.
Whether you’re a beginner or an experienced cook, the clear instructions ensure success. The make-ahead tips, like freezing before baking, make it perfect for busy days. Reheating leftovers is just as easy, keeping the crust crisp and the filling warm.
Feel free to experiment with ingredients to suit your taste. This dish is all about comfort and creativity. Try it today and enjoy the satisfying results of your efforts.