Easy Protein Bar Recipe | Healthy Breakfast Or Snack
Looking for a quick and nutritious option to fuel your day? This simple recipe combines wholesome ingredients to create a satisfying treat. With just a few steps, you can make something that’s both delicious and convenient.
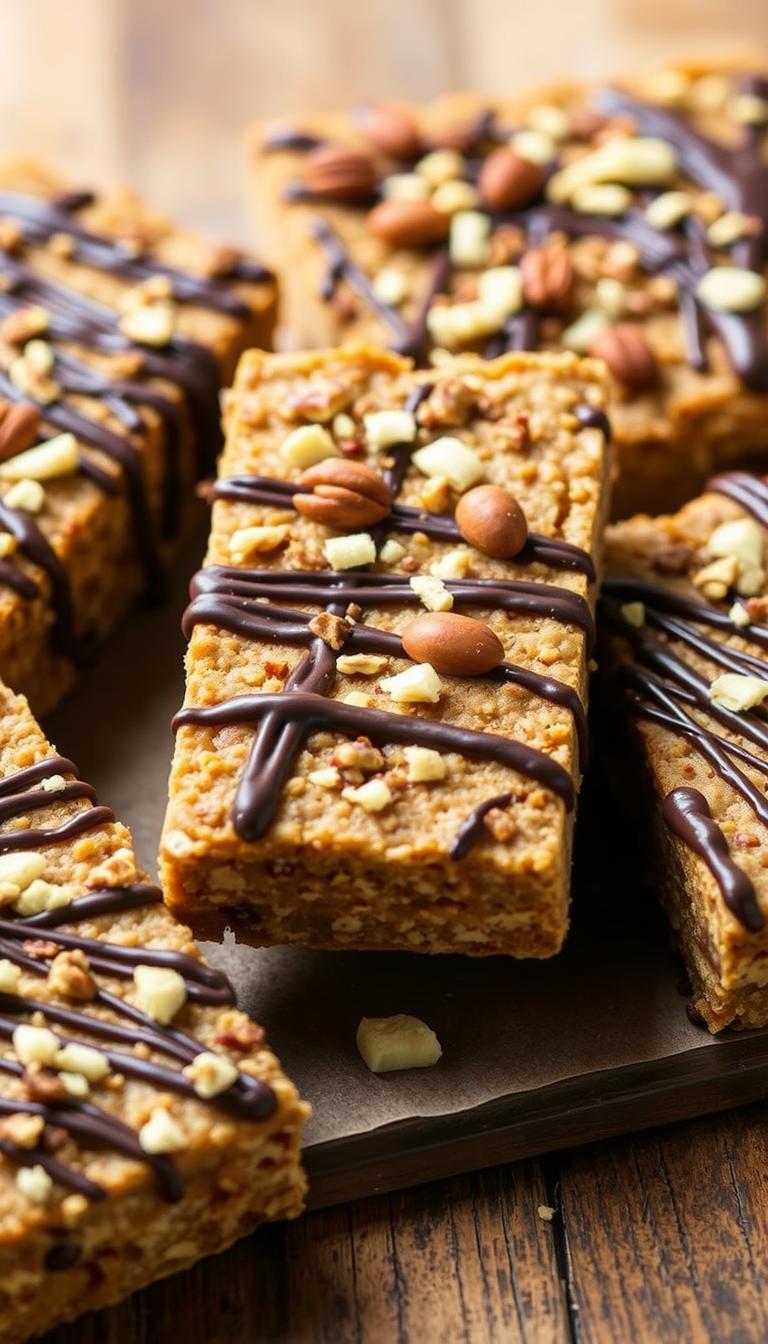
Using peanut butter and rolled oats, this recipe packs a punch of flavor and energy. Add a touch of sweetness with maple syrup or honey, and customize it with chocolate chips for an extra treat. Each bar is designed to keep you full and focused.
Perfect for meal prep, these bars store well in the fridge or freezer. Whether you’re rushing out the door or need a midday boost, this recipe has you covered. Let’s dive into the details and get started!
Key Takeaways
- Simple recipe with minimal ingredients.
- Combines peanut butter and rolled oats for a hearty base.
- Customizable with chocolate chips or other add-ins.
- Stores well in the fridge or freezer for convenience.
- Provides a quick energy boost for busy days.
Introduction: The Benefits of Homemade Protein Bars
Want to take control of what you eat while enjoying a tasty treat? Homemade options let you decide exactly what goes into your snacks. You can avoid preservatives, reduce sugar, and choose high-quality ingredients like peanut butter and rolled oats. This way, you’re not just eating something delicious—you’re fueling your body with care.
Why Choose Homemade Over Store-Bought
Store-bought options often come with hidden additives and high costs. When you make your own, you control the quality and freshness of every ingredient. For example, you can swap out artificial sweeteners for natural ones like maple syrup or honey. Plus, you save money in the long run.
Here’s a quick comparison:
| Feature | Store-Bought | Homemade |
|---|---|---|
| Ingredients | Preservatives, artificial flavors | Fresh, natural choices |
| Cost | Higher per unit | Budget-friendly |
| Customization | Limited | Endless options |
Balancing Taste and Nutrition
One of the best parts of making your own snacks is the ability to balance flavor and health. Add chocolate chips for a sweet touch or nuts for extra crunch. You can also adjust the sweetness to your liking, ensuring every bite is perfect for you.
“Homemade bars let you enjoy the best of both worlds—great taste and nutritional value.”
By preparing your own, you’re not just eating smarter—you’re also enjoying a snack tailored to your preferences. Ready to get started? Let’s dive into the details of crafting your perfect recipe.
Protein Bar Recipe | Healthy Breakfast Or Snack Ingredients
Crafting your own snacks at home starts with the right ingredients. This recipe uses simple, wholesome components to create a treat that’s both satisfying and nutritious. With just a few items, you can make something that fits your lifestyle and dietary needs.

- Peanut butter: Adds creaminess and healthy fats.
- Protein powder: Boosts the protein content for sustained energy.
- Rolled oats: Provides fiber and a hearty texture.
- Maple syrup: Offers natural sweetness without refined sugar.
- Chocolate chips: Optional, for a touch of indulgence.
Each ingredient plays a specific role in the final product. For example, protein powder not only increases the protein content but also helps bind the mixture. Peanut butter adds richness, while maple syrup ensures the bars are sweet enough to enjoy.
| Ingredient | Role |
|---|---|
| Peanut Butter | Provides healthy fats and creaminess |
| Protein Powder | Boosts protein and binds the mixture |
| Rolled Oats | Adds fiber and texture |
| Maple Syrup | Sweetens naturally |
| Chocolate Chips | Optional for added flavor |
Flexibility is key in this recipe. If you prefer almond butter over peanut butter, or honey instead of maple syrup, feel free to swap. You can also use oat flour instead of rolled oats for a smoother texture. This adaptability makes it easy to cater to vegan, gluten-free, or nut-free diets.
Each serving packs about 9 grams of protein, making it a great option for fueling your day. Whether you’re preparing for a busy week or need a quick pick-me-up, these bars are designed to keep you satisfied.
Step-by-Step Instructions: From Mixing to Slicing
Ready to create something delicious and easy to make? Follow these simple steps to craft your perfect treat. Whether you’re a beginner or a pro, these instructions will guide you every step of the way.
Mixing the Ingredients
Start by combining your dry ingredients in a mixing bowl. Add rolled oats, protein powder, and any optional add-ins like nuts or seeds. Mix well to ensure even distribution.
Next, add your wet ingredients. Pour in peanut butter, honey, or maple syrup. Stir until the mixture is sticky and holds together. If it feels too dry, add a splash of water or milk to adjust the consistency.
Fold in extras like chocolate chips or dried fruit for added flavor. Use a spatula or your hands to combine everything thoroughly. The mixture should be firm but pliable.

Setting, Chilling, and Slicing
Line a baking dish with parchment paper for easy removal. Press the mixture evenly into the pan, ensuring it’s compact and smooth. Use the back of a spoon or your hands to flatten the surface.
Place the dish in the fridge for at least 30 minutes to set. For a firmer texture, chill overnight. Once set, lift the mixture out using the parchment paper and place it on a cutting board.
Use a sharp knife to slice into even pieces. For clean cuts, dip the knife in warm water before each slice. Your homemade creation is now ready to enjoy or store for later.
| Step | Details |
|---|---|
| Mixing | Combine dry and wet ingredients in a bowl. Fold in extras like chocolate chips. |
| Setting | Press mixture into a lined pan and smooth the surface. |
| Chilling | Refrigerate for 30 minutes or overnight for firmness. |
| Slicing | Cut into even pieces using a sharp, wet knife. |
Customizing & Substituting Ingredients for Your Needs
Making your own snacks allows you to tailor them to your exact preferences. Whether you have dietary restrictions or simply want to experiment with flavors, this guide will help you adapt the recipe to suit your needs.
Dietary Substitutions: Vegan, Gluten-Free, and Nut-Free Options
If you’re following a specific diet, you can easily modify the ingredients. For a vegan version, swap out honey for maple syrup or agave. Use plant-based butter like almond or cashew instead of peanut butter.
For those avoiding gluten, ensure your oats are certified gluten-free. You can also replace oats with oat flour for a smoother texture. If you’re nut-free, try sunflower seed butter or tahini as a substitute.

Flavor Enhancements: Adding Chocolate Chips, Dates, or Nuts
Want to elevate the taste? Add chocolate chips for a sweet touch or chopped dates for natural sweetness. Nuts like walnuts or almonds add crunch and extra nutrients.
Here’s a quick guide to flavor combinations:
| Ingredient | Flavor Profile |
|---|---|
| Chocolate Chips | Sweet, indulgent |
| Dates | Naturally sweet, chewy |
| Walnuts | Crunchy, nutty |
Experiment with different add-ins to find your perfect combination. The key is to balance flavor and texture while keeping the mixture firm enough to hold its shape.
Enhancing Taste: Tips and Tricks for Perfect Texture
Want to elevate your homemade creation to the next level? The right combination of ingredients can make all the difference. By choosing the best sweetener and nut butter, you can achieve a balance of flavor and texture that’s hard to resist.
Choosing the Right Sweetener and Nut Butter
Natural sweeteners like maple syrup or honey add depth without overwhelming the taste. They blend seamlessly with nut butters, creating a smooth, cohesive mixture. Avoid overly processed options, as they can lead to a sticky or overly dense result.
When selecting nut butter, opt for natural varieties without added sugars or oils. Almond, cashew, or sunflower seed butter can all work beautifully. Each brings its own unique flavor and texture to the mix.

| Sweetener | Nut Butter | Result |
|---|---|---|
| Maple Syrup | Almond Butter | Rich, slightly sweet |
| Honey | Cashew Butter | Smooth, mildly sweet |
| Agave | Sunflower Seed Butter | Nutty, balanced |
Experiment with different combinations to find your perfect match. Small changes can dramatically improve the final product.
“The right sweetener and nut butter can transform a good snack into a great one.”
By focusing on quality ingredients, you can avoid common pitfalls like overly sticky textures or bland flavors. Whether you prefer a rich, indulgent taste or a light, balanced treat, these tips will help you craft something truly special.
Storage and Freezing: Keeping Your Bars Fresh
Keeping your homemade creations fresh and flavorful is easier than you think. Proper storage techniques ensure they stay delicious and ready to enjoy whenever you need them. Whether you’re storing them for a few days or several months, the right approach makes all the difference.
Proper Storage Techniques Using Airtight Containers
An airtight container is your best friend when it comes to preserving freshness. It keeps moisture out, preventing your bars from becoming soggy or stale. For short-term storage, place them in the fridge, where they’ll stay fresh for up to two weeks.

If you plan to keep them longer, the freezer is your go-to option. Wrap each bar individually in parchment paper before placing them in a freezer-safe container. This method keeps them fresh for up to three months, making it perfect for meal prep.
When you’re ready to enjoy a bar stored in the fridge, let it come to room temperature for a few minutes. This step helps restore its texture and flavor. For frozen bars, thaw them in the fridge overnight or at room temperature for about 30 minutes.
“Proper storage not only extends shelf life but also maintains the quality of your homemade treats.”
Labeling your containers with the date of storage is a simple yet effective way to track freshness. This practice ensures you always know how long your bars have been stored, helping you enjoy them at their best.
Nutritional Insights and Health Benefits
Understanding the nutritional value of your snacks can help you make better choices. Each serving of these homemade treats is packed with essential nutrients to keep you energized and satisfied. Let’s break down the key components and their benefits.
Understanding Caloric and Protein Content
Each serving contains approximately 200 calories, making it a balanced option for a quick bite. With over 21 grams of protein per serving, these snacks are ideal for muscle repair and sustained energy. Protein also helps you feel full longer, reducing the need for unnecessary snacking.

| Nutrient | Amount per Serving |
|---|---|
| Calories | 200 |
| Protein | 21g |
| Carbohydrates | 15g |
| Fiber | 3g |
| Fat | 8g |
Compared to protein shakes, these snacks offer a more satisfying texture and longer-lasting energy. The combination of protein and fiber ensures a steady release of energy without spikes or crashes.
Why These Snacks Make a Great Choice
These treats are more than just a quick bite. The high fiber content supports digestion and helps maintain stable blood sugar levels. Healthy fats from ingredients like peanut butter provide long-lasting energy and keep you feeling full.
“The right balance of protein, fiber, and healthy fats can transform your snacking habits.”
For those managing their weight, these snacks are a smart choice. They’re low in added sugars and high in nutrients, making them a better alternative to many store-bought options. Whether you’re on the go or need a post-workout boost, these snacks deliver both flavor and nutrition.
Conclusion
Creating your own snacks at home offers endless possibilities for flavor and nutrition. With simple ingredients like rolled oats and natural sweeteners such as maple syrup, you can craft something that fits your taste and dietary needs. This approach not only saves money but also ensures you know exactly what’s in your food.
Customization is one of the biggest advantages. Whether you prefer nuts, seeds, or a touch of sweetness, you can tailor each batch to your liking. Plus, storing them in an airtight container keeps them fresh for days or even weeks, making them a convenient option for busy schedules.
By making your own, you gain control over quality and nutrition. Experiment with different combinations and share your creations online. It’s a simple way to enjoy delicious, wholesome snacks every day.