Make the Ultimate Grilled Cheese Burrito Recipe Easy
Looking for a meal that combines the best of both worlds? The grilled cheese burrito is here to satisfy your cravings. This fusion dish brings together the comforting warmth of a grilled cheese sandwich and the hearty, customizable goodness of a burrito. Perfect for anyone who loves a crispy exterior giving way to a melty, cheesy interior, this recipe is a game-changer.
With this easy-to-follow guide, you can skip the fast-food lines and create a grilled cheese burrito that’s tailored to your taste. Whether you’re a fan of classic flavors or want to add your own twist, this recipe offers the perfect balance of tradition and innovation. The best part? It’s ready in just 15 minutes, making it a quick and delicious solution for any meal.
Key Takeaways
- Combine the comforting elements of grilled cheese with the versatility of a burrito.
- Customize your filling to suit your taste preferences.
- Achieve a crispy exterior and a melty interior with simple steps.
- Prepare a delicious meal in under 15 minutes.
- Explore various fillings and flavors to make it your own.
Introduction to the Cheesy Burrito Experience
Imagine a dish that brings together the bold flavors of a burrito and the creamy delight of cheese. This cheesy burrito offers a unique experience that combines mouthwatering textures with rich flavors. Each component, from the seasoned beef to the dollop of sour cream, plays a vital role in creating a layered, flavorful burrito.
The allure of this dish lies in its simplicity and customization. With a base of tender beef, you can add your favorite fillings like Spanish rice, refried beans, or even crunchy elements like Flamin’ Hot Fritos for added texture. The key to this recipe is the harmonious blend of a savory sauce and the creaminess of cheese, which elevates the burrito to a whole new level.
While inspired by the popular fast-food version, this homemade recipe stands out with its use of high-quality ingredients and personal twists. Whether you’re a fan of classic flavors or prefer something more adventurous, this cheesy burrito offers a superior taste experience that’s hard to resist. Get ready to uncover the secrets behind this delicious creation and take your meal game to the next level.

Essential Ingredients and Preparation Steps
Creating a delicious dish starts with the right ingredients. For this recipe, you’ll need a few key components to ensure the best flavor and texture.
The foundation of your meal includes 1 pound of ground beef, which can be either 90/10 or 85/15 lean-to-fat ratio. You’ll also need 1 cup of cooked Mexican rice and 1/3 cup of nacho cheese sauce for that creamy touch. Don’t forget 4 to 5 large flour tortillas, as they provide the perfect wrap for your filling.

Preparation is straightforward. Start by browning the ground beef with a blend of spices like chili powder, cumin, and smoked paprika. Next, cook the Mexican rice with 1½ cups of chicken broth and a hint of tomato sauce. Warm the flour tortillas for about 15-30 seconds to make them pliable, then fill them with your prepared ingredients and a generous helping of shredded cheese.
Quality matters. Using fresh, high-quality ingredients ensures your dish turns out flavorful and authentic. The right balance of spices and sauces will elevate your meal, making every bite a delight.
Mastering Ground Beef Taco Meat
Ground beef is the heart of a great taco meat, and getting it just right can make all the difference. Whether you’re a seasoned cook or just starting out, perfecting this step will elevate your dish to the next level.
Seasoning and Browning Techniques
To start, heat a skillet over medium-high heat and add your ground beef. Break the meat into small pieces as it cooks. This ensures even browning and prevents chunky texture. Once the meat is fully browned, drain excess fat to avoid a greasy taste.
Next, add your taco seasoning, including chili powder and cumin. Stir well to coat the meat evenly. Let it cook for a few minutes to allow the flavors to meld. This step is crucial for developing a rich, savory flavor profile.
Simmering for Maximum Flavor
After seasoning, reduce the heat to low and let the meat simmer. This step allows the flavors to deepen and the meat to become tender. For added depth, you can stir in a tablespoon of tomato paste and a splash of water, then continue simmering for another 10 minutes.
The result is a perfectly seasoned, flavorful beef filling that’s ready to be the star of your meal. With these simple steps, you’ll achieve a delicious, restaurant-quality ground beef that enhances any dish.

Perfecting Your Spanish Rice
Spanish rice is a cornerstone of a great burrito, offering a flavorful base that ties all the components together. Achieving the perfect texture and taste requires attention to detail, starting with a crucial step: toasting the rice.
Toasting the Rice for Nutty Flavor
Begin by heating a skillet over medium heat and adding a tablespoon of oil. Once the oil is hot, pour in your rice and stir to coat the grains evenly. Toast the rice for about 3 minutes, stirring occasionally, until it develops a light golden hue and a nutty aroma. This step enhances the rice’s flavor and texture, giving it a subtle crunch that complements the softness once cooked.
After toasting, add 4 cups of chicken broth, 8 ounces of tomato sauce, and your choice of seasonings. Bring the mixture to a simmer, then reduce the heat to low, cover, and let it cook for 20-25 minutes. Avoid stirring too much to prevent the rice from becoming mushy. After the cooking time, turn off the heat and let it steam, covered, for an additional 10 minutes. This resting period allows the rice to absorb any remaining liquid, resulting in fluffy, separate grains.
| Stage | Time | Key Points |
|---|---|---|
| Toasting | 3 minutes | Medium heat, constant stirring |
| Simmering | 20-25 minutes | Low heat, covered |
| Steaming | 10 minutes | Resting after cooking |
Stirring the rice gently after it has rested will help separate the grains, ensuring a light and airy texture. This method guarantees a perfectly cooked Spanish rice that balances the savory beef and melted cheese in your burrito, creating a harmonious and delicious meal.

Crafting a Creamy Chipotle Mayo Sauce
Discover how to create a rich and tangy chipotle mayo sauce at home. This creamy condiment is perfect for adding a smoky kick to your dishes.
| Ingredient | Quantity | Notes |
|---|---|---|
| Mayonnaise | ½ cup | Provides creaminess |
| Sour Cream | ½ cup | Adds tanginess |
| Lime Juice | 2 tablespoons | Enhances acidity |
| Honey | 1 tablespoon | Balances sweetness |
| Chipotle Chiles | 2-3 peppers | Adjusts heat level |
To make the sauce, blend all ingredients until smooth. Start with 2 chipotle peppers for medium heat, adding more if desired. This method ensures a consistent flavor every time. The result is a creamy, homemade sauce that elevates any meal.

Assembling and Rolling Your Burrito
Now that your ingredients are ready, it’s time to bring everything together. Assembling your burrito requires careful layering to ensure each bite is packed with flavor and texture.
Layering the Fillings Strategically
Start by spreading a layer of Spanish rice across the center of your tortilla. Add a generous portion of seasoned beef on top, followed by a sprinkle of crunchy tortilla strips for added texture. Drizzle nacho cheese sauce over the beef, then add any additional toppings you prefer, such as diced tomatoes or shredded lettuce.
| Action | Time | Key Points |
|---|---|---|
| Layering Fillings | 2-3 minutes | Balance flavors and textures |
| Rolling the Burrito | 1 minute | Firm, tight roll to prevent spillage |
| Grilling | 2-3 minutes per side | Skillet medium heat, even toasting |
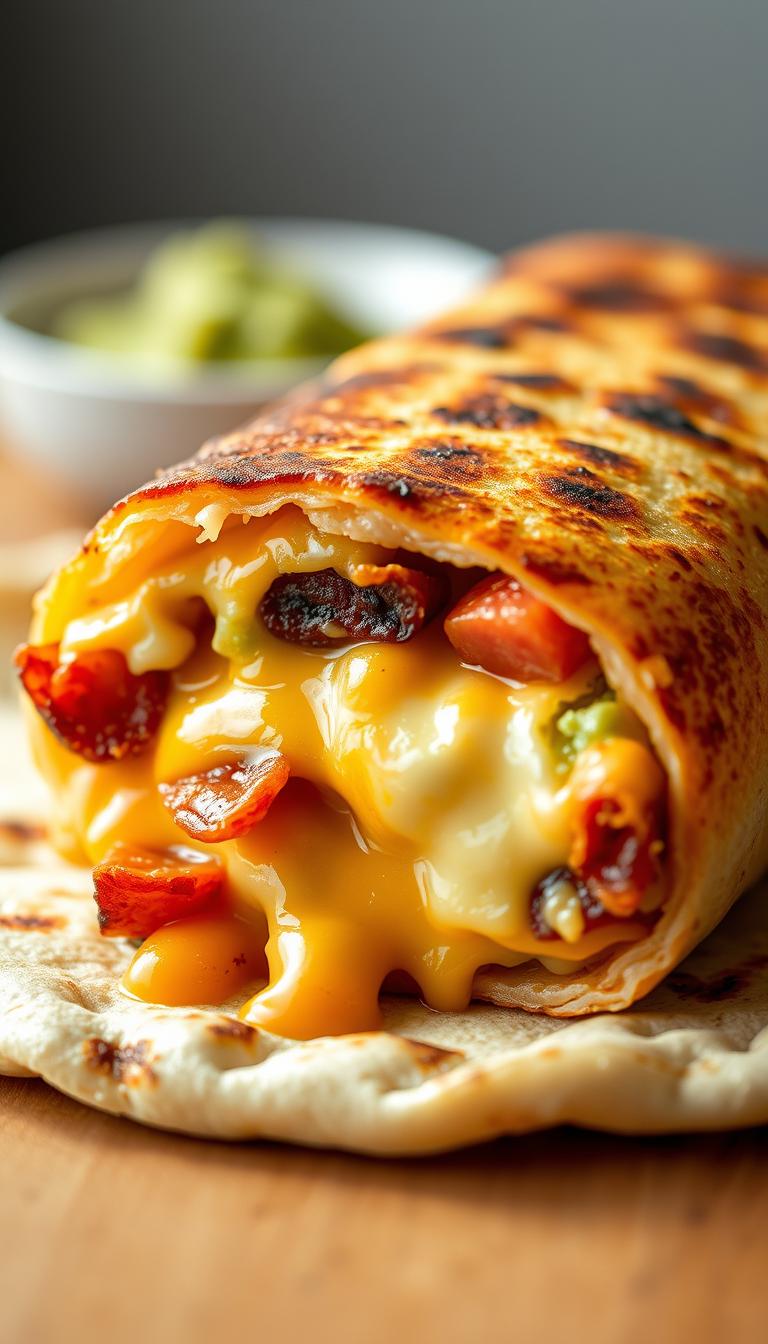
Grilling for a Crispy Cheese Finish
Once your burrito is assembled, it’s time to give it a golden, crispy finish. Place the burrito in a preheated skillet medium heat. Add a cup shredded cheese to the skillet, letting it melt slightly before placing the burrito on top. Cook for 2-3 minutes on each side, until the cheese is bubbly and the tortilla is crispy. Use a spatula to carefully flip and handle the burrito, ensuring even toasting.

This method ensures a satisfying crunch on the outside and a soft, cheesy interior. With these steps, you’ll master the art of assembling and grilling a burrito that’s both delicious and visually appealing.
Creating the ULTIMATE GRILLED CHEESE BURRITO RECIPE
Discover the final, refined version of the grilled cheese burrito that seamlessly combines every element for a delicious meal. This homemade creation takes inspiration from the famous Taco Bell favorite but elevates it with high-quality ingredients and meticulous preparation.
At the heart of this recipe is the perfect balance of flavors and textures. The key to achieving a crispy exterior lies in using nacho cheese and cooking in a skillet medium heat. This method ensures a golden, cheesy finish that enhances the overall taste.
The assembly process is straightforward but crucial. Layer Spanish rice, seasoned beef, and your choice of toppings. Drizzle with nacho cheese sauce for added creaminess. The result is a burrito that’s both innovative and comforting, blending fast-food nostalgia with homemade excellence.

Storage, Reheating, and Serving Suggestions
Once you’ve crafted your perfect meal, it’s important to know how to store and reheat it properly. This ensures your dish remains flavorful and crispy for future meals. Let’s explore the best ways to keep your burritos fresh and how to reheat them to maintain that delicious texture.
Leftover Storage Options
If you don’t plan to eat your burritos immediately, storing them correctly is key. Use an airtight container or a store them in a sealed plastic bag. This keeps them fresh for up to 3 days in the refrigerator. For longer storage, consider freezing them. Place each burrito in individual freezer-safe bags or wrap them tightly in plastic wrap and then in aluminum foil. Frozen burritos can be stored for up to 3 months. When you’re ready to eat, simply thaw and reheat.
Reheating Techniques for a Crispy Finish
Reheating your burritos properly is essential to maintain their crispy exterior and cheesy interior. For the best results, use a skillet over medium-low heat. Place the burrito seam-side down and cook for about 2-3 minutes on each side. This method ensures the cheese melts evenly and the tortilla remains crispy. If you prefer, you can also reheat in the oven at 375°F for 10-15 minutes, wrapped in foil. Remove the foil for the last few minutes to crisp up the exterior.
For a quick option, microwave reheating works well. Wrap the burrito in a damp paper towel and heat for 30-45 seconds. This helps retain moisture without making the burrito soggy. Be careful not to overheat, as this can dry out the filling.
Serving suggestions can elevate your meal. Drizzle with extra nacho cheese or serve with a side of salsa or hot sauce. For a balanced meal, add a small bowl of fresh salad or a dollop of sour cream. These additions not only enhance flavor but also provide a refreshing contrast to the rich, savory burrito.
Consider seasoning adjustments when reheating. A sprinkle of cumin or a dash of chili powder can refresh the flavors. Managing fat content is also easy—opt for low-fat cheese or reduce the amount of nacho sauce for a healthier option. These small tweaks allow you to enjoy your meal while keeping it nutritious.

With these storage, reheating, and serving tips, you can enjoy your burritos whenever you want while maintaining their delicious taste and texture. Whether you’re meal prepping for the week or satisfying a late-night craving, your burritos will always be ready to impress.
Conclusion
As you complete your journey from selecting ingredients to crafting the final grilled cheese burrito, take a moment to appreciate the balance of flavors and textures that make this dish special. Each component, from the seasoned beef to the creamy cheese sauce, plays a vital role in creating a harmonious and delicious meal.
For those looking to mix things up, consider substituting the beef with chicken for a fresh twist. This versatility allows you to enjoy the same great taste with different proteins, keeping your meals exciting and varied.
When storing leftovers, use an airtight container to keep your burritos fresh for up to three days. For longer storage, freezing is a great option. Reheating tips include using a skillet over medium-low heat or the oven for a crispy finish, ensuring every bite remains flavorful and satisfying.
Remember to enjoy your meal mindfully, considering nutritional balance. You can opt for lower-fat cheese or reduce the meat portion for a healthier option without compromising on taste.
Finally, we invite you to share your experience with this grilled cheese burrito recipe. Leave a comment below, and don’t forget to follow us on social media for more creative and indulgent meal ideas. Your feedback helps us grow and continue to provide you with the best recipes for your culinary adventures!